Sunday, June 22, 2014

Securing the Couch

To keep the couch from sliding around, but keeping it a little bit away from the wall so the leather won't get scuffed, I came up with these simple but effective collars cut from 1" oak with a 2-1/8" hole cut in them with a hole saw.  Theoretically the couch could jump out of these, but I don't think it will, because it's heavy enough, and 1" of vertical bump seems unlikely.  I will find out.
This seemed like a better approach that others I was considering, because the couch can easily be repositioned if I want to move it, just by lifting it out of the collars.


Drill Holder

I came up with a great way to store my trusty DeWalt drills so they're quickly accessible, don't take up room elsewhere, and can be secure.

I cut a piece of 3" ABS plastic pipe to 12" length, then set the fence and ran it through the table saw, flipping it end-for-end, such that the slot in the pipe is just over 2" wide, which is just right for my DeWalt drills without hitting the forward/reverse button on the side.  Your mileage may vary.

I still need to secure the drills from sliding out when the trailer is underway, but that's a little thing. I'm quite happy with the way they turned out.


Monday, June 2, 2014

Raspberry Pi

I brought up the world's smallest computer (more or less) that runs Linux -- the famed Raspberry Pi.  The MOUSE is larger than the computer.  It's nothing short of amazing!


See that little tiny thing about the size of a credit card with a bunch of wires connected to it?  In the top photo, it is between the mouse and the keyboard.  That's the computer.  The cords are USB (for mouse and keyboard), the white cord is HDMI to the monitor, and the one in the back is a microUSB cord that goes to a power adaptor and provides power.  If you don't already have a Raspberry Pi , you should get one, if for not other reason than they just cost $25 (or $37 for the more useful B model) and they will have historic value not long from now...

Adding in Equipment

It's a mess, but I've got things running in the lab now, including:


  • internal WiFi network that bridges to an external network through an external antenna that pokes out through a hole in the trailer, since the sheet metal sheathing blocks most WiFi signal from getting through. I chose a PepLink PepWave , which is an awesome device. I also bought this external antenna extension to poke through the exterior. It works great!

  • A Monitor Arm Mount that supports two monitors and articulates.  Awesome.
  • Got one of my iMacs running on the network and the 120v power. It is also running Parallels and Windows XP and on top of that ... Solidworks!

Wednesday, March 19, 2014

Cabinet Details


Bolted the cabinets to the walls:


and bolted the tops to the cabinets


Wiring up the solar panels

The solar panels are wired in parallel, so they provide 12v but the more panels there are, the more current flows (if you wire them in series, you increase the voltage, not the current flow).  Parallel means positive-to-positive-to-positive, etc.  Of that, I'm positive.

To work with the MC4 connectors, which are great and snap together, you (I) will need Y connectors every time you want to splice another panel into the mix. Since I have 3 panels, I found the perfect 3-Way Y connector on Amazon:


One connector is male-to-3-female, the other is female-to-3-male.  Ahem.  You need one of each because each panel has a positive (male) and negative connector coming out of it.  So each panel plugs one wire into each of these 3-way connectors, and you have one pair coming out (the 1-side of each Y).  Easy as cake.

A couple of 
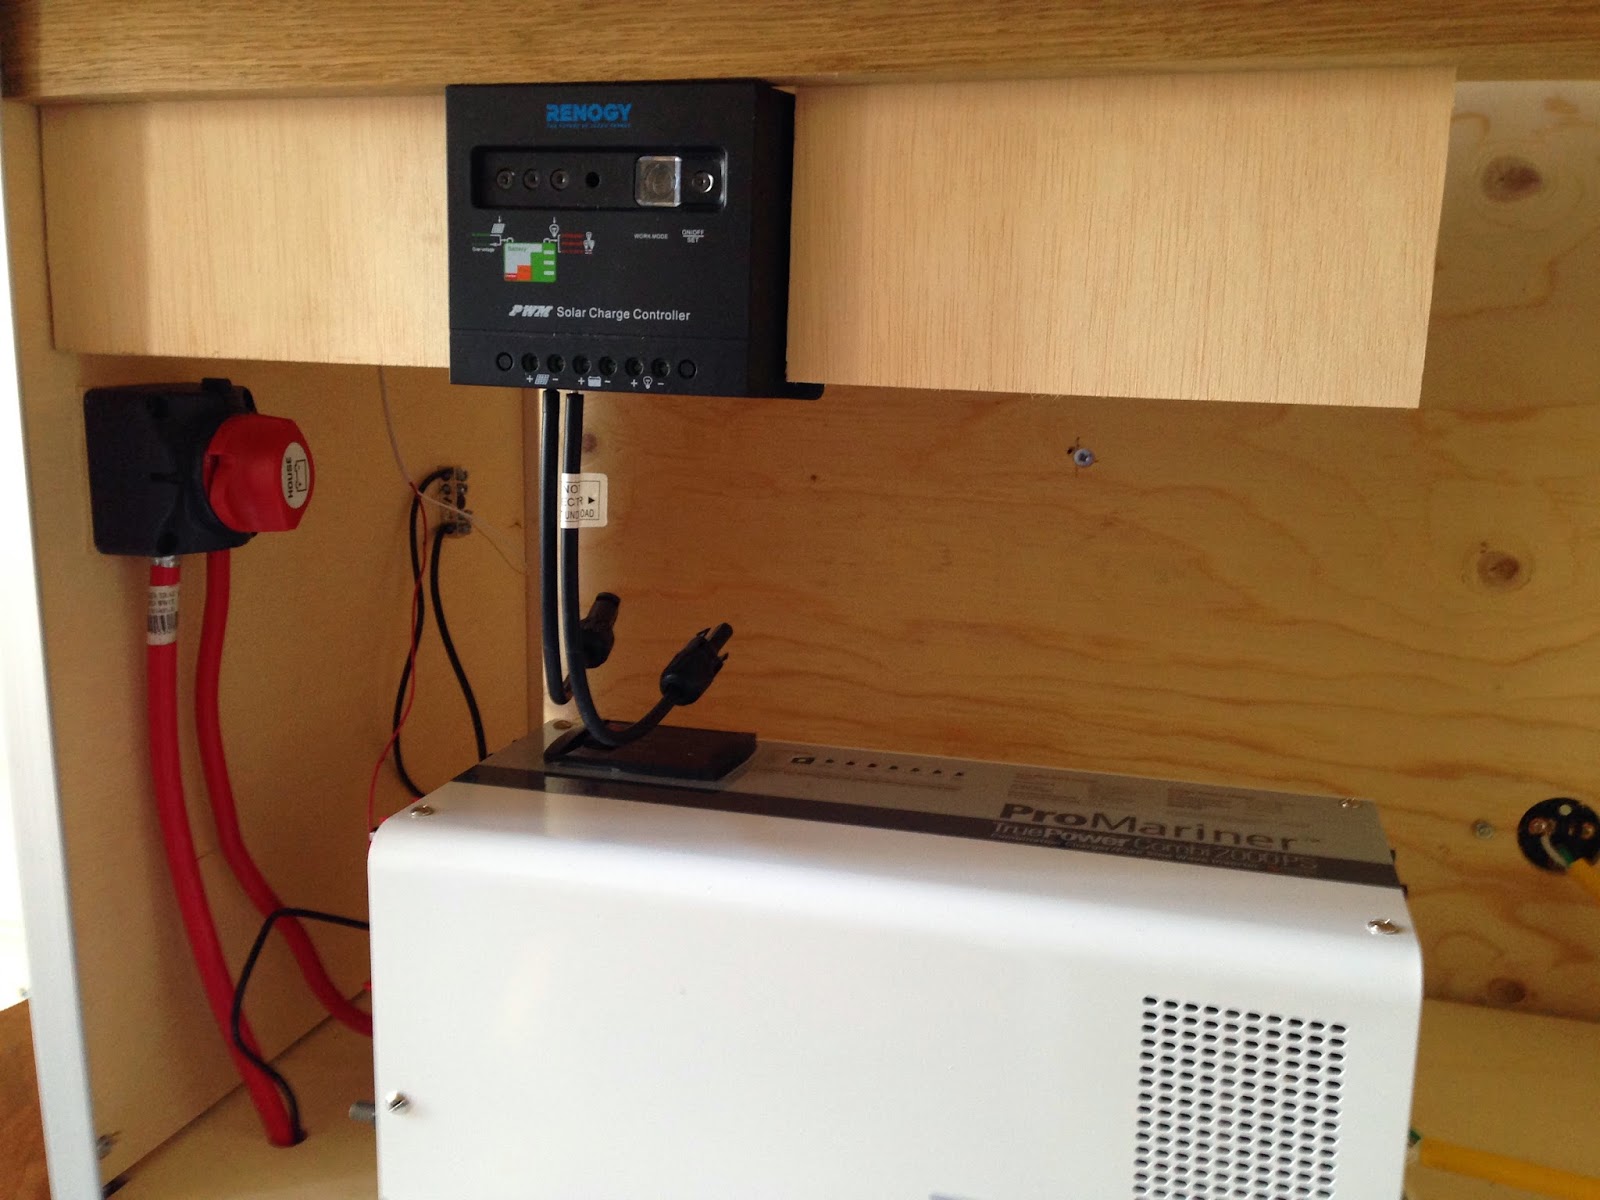
extensions (15') and a special MC4-to-bare-wire pigtail and you can hook the panels up to the charge controller, which basically keeps the voltage and current under control so it's less flaky when it interacts with the rest of the system. The extensions go through a hole cut in the side of the trailer (gulp) with a Blue Sea Systems Side Entry CableClam (which I never knew existed, but is clever for waterproofing a through hole for a cable with connectors on the ends) to make it waterproof.


Saturday, March 15, 2014

Solar

I decided to put solar panels on the roof of the trailer so it can charge the battery bank whenever it's sunny. I have all the components now but haven't started the installation because I'm trying to decide whether (and how) to make them tilt toward the sun, which makes them much more effective. Unfortunately, because the trailer is mobile, it could end up in any orientation relative to the sun, so the panels would have to have a pretty elaborate tilting mechanism. Or not -- I could just have one tilt direction for my own driveway, and figure that is the 80% case. Still thinking about that.

I bought RENOGY panels and boxes, through Amazon. They appear to be good quality, and the company was responsive. They are 100W panels and I bought 3 of them. As of today, Amazon has a kit with two panels for about $330. I added a single additional panel, and had to buy some Y connectors to wire them all in parallel, here on Amazon.